
Introduction
My first Wivamac lathe was a DB1000 vario, purchased in the days before they offered a remote control so being that way inclined, I made my own. The “mark 1” prototype is still in operation somewhere in the Czech Republic as far as I know! More about the remote later. The inverter drives used on the “vario” range are general purpose controllers and as such, have a bewildering array of parameters that can be changed to suit the operation in hand. With a little experimentation (and reading the manual!), I found a few key parameters that can be tweaked to make the turning experience that little bit easier.
Following my initial experience on the DB1000 vario, I upgraded to a DB1200 vario and applied the same principles to this one too. My DB1200 has a similar remote control to the one I made for the DB100 apart from one feature. Having made the first one “smart” enough to switch control when it was plugged in, I found that I never used the lathe without it so with the “mark 2” I dispensed with the complication of the plug and automatic switching and went for a hard wired remote with a manual switch (just in case!).
Disclaimer
If you are undertaking any physical modification to the electronics on your lathe, make sure you are competent to do so. Otherwise, consult someone who is. You may invalidate your warranty by making modifications so please consult your supplier before proceeding.
Some of the modifications described here alter the acceleration and deceleration times and if used incorrectly, can potentially lead to your chuck unscrewing itself and large pieces of wood leaving your lathe at speed so PLEASE DON’T DO IT UNLESS YOU KNOW WHAT YOU ARE DOING!
Before making any parameter changes, note the original value so you can change back if required.
After making any changes to the parameters, test the lathe thoroughly in forward and reverse without any wood attached.
The bottom line – any changes you make are done at your own risk.
The Super Deluxe Wivamac Remote Control
I still like to think I thought up the remote control option before Wivamac did! I certainly had a working model long before they did. My main reason for making a remote control unit was because I disliked bending down to use the existing controls. The remote control box put the controls where I wanted them – anywhere I could stick the magnetic box!
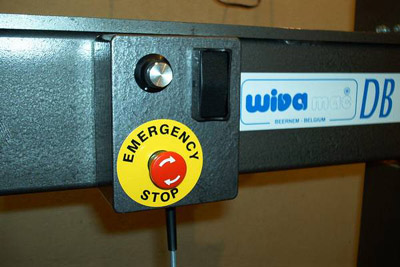
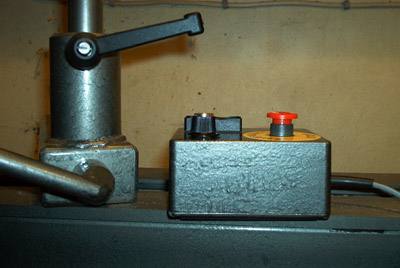
My design of the remote control gives forward/reverse direction, speed control and emergency stop. The latter comes in very handy when hollowing because the remote can be placed on the bed, right under where I am holding the tool for quick access. Also, no matter which way the control is switched, the emergency stop on the main control box always remains active. What use is an emergency stop that doesn’t stop when you hit it? The modification to the lathe is relatively straight forward – just a couple of holes for the switch, cable and terminal block and that’s it. Here are some photos of mine to give you an idea of what it is like. The box is diecast to survive being dropped and the potentiometer and switches are sealed and should be dustproof.
I still have a few of these remote control boxes made up so if you want to save yourself some work, drop me a line. Obviously I will include diagrams, all the wire you will need, fixings etc. for £ 75 plus postage.
Inverter drive adjustments
The values and parameter numbers below apply to the Fuji Frenc-mini unit. I used the same principles on the Hitachi unit I used to have on the DB1000 but without one to hand, I can’t vouch for the parameter numbers etc. so you must ensure you are confident with making such changes and that you can reverse them if necessary.
Acceleration and Deceleration times
If you have ever turned very large pieces of wood on your Wivamac lathe, you might have found that the default deceleration time of 6 seconds wasn’t long enough and your large piece of wood didn’t stop quite as expected but “freewheeled” for a few seconds. This is can be fixed by increasing the deceleration time to allow the motor and controller to bring the rotating mass to a halt safely.
Conversely, when working on very small pieces of wood, the default 6 seconds for acceleration might be too much so I program the controller for a 3 second acceleration and deceleration time.
Note: A deceleration time which is too short might cause your chuck to unscrew so test without any wood attached first!
To change the Acceleration and deceleration, the following parameters should be changed
| Parameter Number | Factory value | Paul’s modified value |
|---|---|---|
| F07 (Acceleration time 1) | 6 | 3 for small work 6 for medium work 10+ for large work |
| F08 (Deceleration time 1) | 6 | 3 for small work 6 for medium work 10+ for large work |
Minimum and Maximum frequency
The inverter / motor combination are set by Wivamac to operate from 15hz to 50hz. With a couple of changes, you can reduce the lower frequency and increase the upper frequency to extend the range. The main advantage of this is to reduce the number of times you need to change pulleys to switch ranges. In practice, I adjust the limits on my lathe to 10hz – 60hz as that covers most things I need. Bear in mind that the lower speed may cause the motor to overheat if you run the motor too slow for too long. The fan on the motor is driven by the motor so slow motor = slow fan = less cooling…
Also bear in mind at the other extreme that running the lathe too fast may cause the bearings to overheat. Don’t run the lathe faster than the designed maximum speed because you may cook your spindle bearings. Having said that, this part only really applies if you are on the fastest pulley range.
If you are sure what you are doing, these are the parameters to change
| Parameter Number | Factory value | Paul’s modified value |
|---|---|---|
| F03 (Maximum Frequency) | 50 | 60 |
| F16 (Frequency Limiter – Bottom) | 15 | 10 |
Get rid of that dead spot
With the standard set up, the speed potentiometer seems to have no effect on the speed until it has been turned past the first quarter-turn. This is because the lower lathe speed is limited to 15 (or 10hz if you followed my instructions in the last section). The potentiometer covers the range from zero upwards so until you get past the lower limit, it doesn’t change anything. This can be fixed simply by programming an offset to the speed potentiometer.
To change the offset for 10hz offset, the following parameter should be changed
| Parameter Number | Factory value | Paul’s modified value |
|---|---|---|
| F18 (Bias for frequency command) | 0 | 16.67 |
Your Suggestions?
No doubt there are others with Wivamac lathes out there who have come up with their own modifications. It would be great to hear some other good ideas so feel free to drop me a line.