
Mounting the off centre arc bowl blank on the lathe
Now the blank is prepared, we need something to mount it on that will allow it to be off-centre by 7.5 cm. The centre of the blank is offset from the true centre by the difference between the arc radius and the arc height: 12.5 – 5 in this case. A bandsaw isn’t the only tool I didn’t possess, I don’t have an eccentric turning attachment either so I improvised with a piece of (roughly) 10cmx1cm pine which happened to by handy and more or less the right length! Any suitable offcut could be used as long as it was thick enough to take the screws used for mounting. I marked (but didn’t drill – you will see why later) the centre of the piece of pine and also marked out the offset centre, 7.5cm to one side of it. At the offset centre, I also marked out two additional points, equidistant from the offset centre. These were then pilot drilled for the mounting screws for the blank.
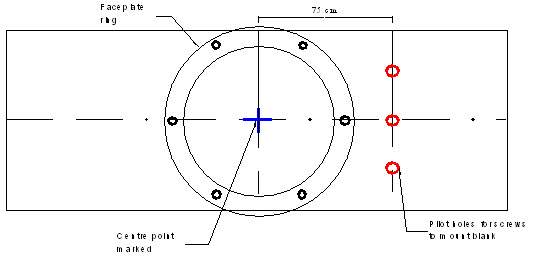
I mounted a faceplate ring centrally on the back of the piece of pine, which I could mount onto the ‘C’ jaws on my Axminster chuck. Any faceplate mount would be equally as good as long as it didn’t restrict access to the blank mounting screws and was firmly attached to the base. Next the blank was centred using a screw through the pilot hole to locate it correctly. The additional pilot holes either side were also used to screw the blank to the pine backing, taking care to line up the blank in the process. The three screws in a line will allow the blank to be easily reversed, using the same holes, for the second arc to be cut later.
Balancing
You might notice at this stage that the whole thing is considerably off-centre and seriously unbalanced! so to avoid clashing with the laws of Sir Isaac, we need to add a counter weight. I used some pieces of flattened lead pipe (because it was handy!). The advantages of using lead are that it’s much denser so you don’t need a piece the size of the wooden blank you just set up. As it is much denser, it can be mounted well inside the turning circle of the wood so there is no danger of you catching either you or your tools on it while turning. Just to be on the safe side, I did knock the sharp edges off it as I had cut it with some tin snips that left a sharp edge.
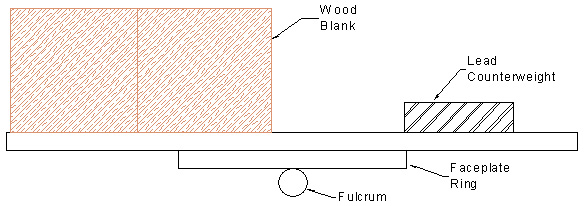
To balance the whole assembly, I put the centre of the faceplate ring across a circular shaft of a gouge, which acted as a fulcrum for the “seesaw”. Any suitably sized bar, screwdriver etc. could be used. I found a round bar to be easier to work with than a fulcrum with a thin edge as it gave a little more leeway in the process. I then put the lead on the opposite side to the wood and moved it around until the whole thing was balanced. I offset the lead by just a fraction towards the centre so the blank side was just tipping the balance as this side would lose weight in the cutting process and I was aiming for an average balance rather than have to rebalance too often. Once the final position was established, The lead was screwed down with a couple of screws of a suitable length so they held the lead firmly without protruding through the other side of the backing piece
Next – Cutting the first curve
Back to How to turn an arc bowl