
Where to start
Grain Orientation
I always turn a goblet out of a single piece of wood. It can either be a whole section log or a square cut piece. Whole log sections can be used when woodturning to produce natural edge goblets, which are obviously intended to be purely decorative. The main thing here is that the grain is running parallel with the stem to give it maximum strength.
Timber Selection
We have already discussed the grain orientation to give strength to the stem but choice of timber is also relevant if the goblet is intended to be used. Traditionally, drinking vessels would have been made from timbers such as cherry, apple (or any of the fruit woods) or sycamore. Toxic timbers such as yew should be avoided for goblets intended to be used.
For an average goblet, a piece of wood around 20 – 25 cm in length and 5 – 10 cm wide would be ideal. A few ideas for shapes can be found on my Creative Woodturning website
Mounting on the lathe
The piece of wood is initially mounted between centres. If a whole log section is used, I deliberately offset the pith in the same direction at each end so (hopefully!) the centre of the stem won’t be where the pith is. This is to avoid the inherent weakness found in the pith with many types of wood.
Before starting the lathe, rotate the workpiece by hand to ensure it doesn’t hit the toolrest. Also check that the lathe speed is slow enough. The usual safety precautions for protective clothing and long hair and jewellery should also be observed whenever working on a lathe.
A generous spigot is cut to allow the piece of wood to be held in a chuck.

I usually use the “gripper” type jaws for this kind of work. The serrations in the jaw give a much better grip and as the spigot will not form part of the finished item, the damage caused by the chuck jaws to the wood doesn’t matter.
Hollowing the cup
Once the spigot has been turned, the chuck is used to hold the piece of wood. This allows full access to the end, enabling the goblet cup / bowl to be hollowed. It is important to note that the goblet is formed from the cup end, working back in sections to the foot, finishing each section as you go. This ensures maximum support is maintained for the section being cut. It would be very difficult to hollow and shape the goblet cup / bowl if the stem had already been turned very thin so please take note of the sequence of actions.
First, take light cuts across the end of the wood to square up the end and to clean up what is a roughly sawn surface to start with. Once the end is clean and square, a hole can be drilled in the cup end as a start to the hollowing process. The hole can be drilled either with a large twist drill held in a tailstock mounted jacobs chuck; with a forstner or sawtooth bit or my preferred method is to drill using a 13mm spindle gouge with a fingernail grind.
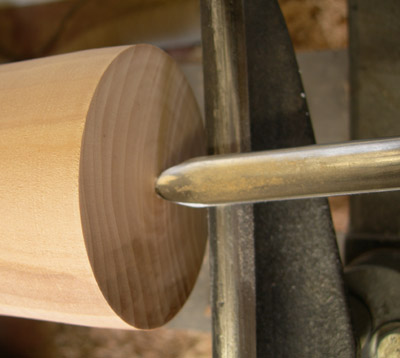 This method needs the toolrest to be set to the correct height across the end of the wood to present the cutting edge of the gouge exactly at centre height. Which ever cutting method you use, remember to withdraw the tool frequently and clear the shavings to prevent binding and excessive heat.
Once the hole is drilled to the required depth, it can be opened up to form the shape for the inside of the cup. Hollowing can be done with a curved-edge scraper, one of the many proprietary hollowing tools on the market, or my personal favourite method, a combination of spindle gouge and ring tool. If you are not confident with forming the shape of the inside of the cup with no reference or external shape to follow, a paper or card template can be made to allow you to check the shape is developing as you intended.
Once the shape is formed, light sheer scraping cuts can be used to improve the surface prior to sanding. When sanding, start at 120 or 150 grit and make sure you remove all tool marks before progressing to the next grit. Work through the grits progressively without skipping any.
Finishing the inside of the cup
If the goblet is intended for use, step 1 is to mark the piece of wood and the chuck to allow realignment, then remove the wood from the chuck. The wood will need to be sealed to prevent liquid soaking in. I opt for the traditional approach and use beeswax. Flakes are shaved from a stick of beeswax into the goblet cup.
 Around a tablespoon of wax chips are needed but it will depend on the absorbency of the wood so adjust accordingly if the whole lot soaks straight in! A hot air source, such as a hair dryer or paint stripper, is used to gently melt the wax in the cup. Don’t use a blowtorch or other source of naked flame because it will ignite the molten wax and ruin your goblet!
As the wax melts, roll the goblet cup around to allow the wax to soak in to the whole surface. Remove and reapply the heat to keep the wax molten and flowing without overheating the wood. Once the whole inside surface of the cup is coated, drain the remaining drops of wax out of the cup and remount the work in the chuck, using your alignment marks to get it back where it was. Use a pad of absorbent kitchen paper towel or safety cloth and apply enough pressure on the inside of the goblet cup to melt the wax. The idea here is to take of the excess from the surface and leave a nice finish. Turn or fold the pad as you go to present a clean surface once the tissue becomes saturated.
A more durable waterproof modern finish is either Rustins plastic finish or Chestnut melamine lacquer.
For more reliable waterproofing, there are proprietary finishes available for use, such as Rustins two part plastic finish or Chestnut melamine lacquer.
If the goblet is just decorative, apply sanding sealer to the inside of the cup, allow to dry, cut back with either fine abrasive, 0000 wire wool or webrax. Apply a thin coat of wax polish and buff well with a clean safety cloth. You can use your own choice of finish if you prefer
Next – Shaping the cup